Set Up Your Piercing Space
- Find a clean well-lit space with a chair for the person to be pierced and a table where you can spread out your piercing supplies.
- Review all the supplies included and make sure you know what everything is for.
- Read your piercing instructions carefully before you start. Keep the instructions handy for reference when you pierce.
Reminder: follow the instructions provided in your home piercing kit carefully. Here are some additional tips to help your home piercing session go smoothly!
- Dotting the Ear:
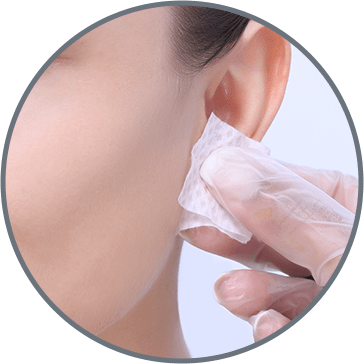
- Wash & dry your hands carefully and put on the single-use gloves provided BEFORE you cleanse the ear for dotting and piercing.
- The front and back of the piercing site should be cleansed with the alcohol towelette and allowed to dry before you dot the ear.
- Using the Inverness surgical marking pen, mark the ears. Start by placing a small dot on one ear. Use a mirror to make sure the dot is in the right place.
- If the dot is not where you want it, clean it off with the alcohol towelette and start again!
- Proper Aiming:
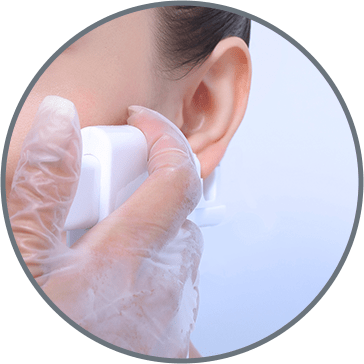
- Hold the instrument firmly in one hand with the back of the piercing earring cartridge against the back of the ear.
- Place a finger from your other hand against the back of the instrument (behind cartridge) for support.
- Make sure the instrument/cartridge are parallel to the face. You want the earring to go in straight – not at an angle to your face.
- Use even pressure, slowly depress the plunger to push the inner capsule out of the cartridge toward the dot.
- Aim with the plastic tip of the cartridge ONLY – do NOT push the earring post out of the cartridge until you are lined up and ready to pierce.
- Make sure your angle is right and that you are lined up properly before you pierce.
- How to Pierce
- Once you are lined up and ready to go, pierce quickly and firmly by depressing the plunger all the way until it can go no further.
- Hold firmly for a slow count of 3.
- Release and move the instrument down and away.
Repeat these steps for the second ear!
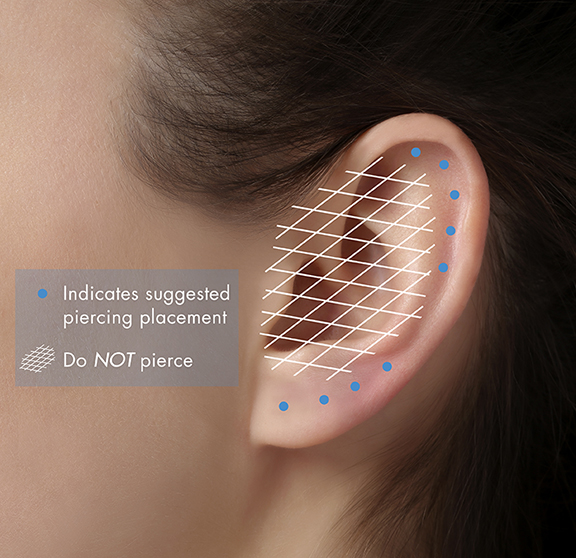
The dots on this ear show where it is safe to pierce with the Inverness Home Piercing Kit.
Before dotting, look at the size and shape of each ear and placement of existing piercings.
First Ear Piercing in the Earlobe: Follow the natural line of the ear. Place the dot on the center of the earlobe(s).
Multiple Earlobe Piercing: Follow the natural line of the ear. Mark dots 1/4” to 3/8” apart, depending on the size and shape of the ear and the earring styles to be worn later. Check placement for uniform spacing between each piercing and for alignment across the face.
Outer Cartilage Placement: Cartilage piercings should be placed in the open channel, just inside the curl. Do not pierce any spot where the curl curves tightly into the ear and covers the channel making it difficult to dot and pierce.
Thinking about a second or third piercing for your earlobe or outer ear cartilage? Keep these tips in mind:
- Remember that every ear is unique. Examine your ears carefully to determine whether they are the right size and shape to fit the piercings you want and the earrings you like to wear.
- Space your new piercings properly. The average person will need about ¼” between holes, but spacing is unique for everyone. The hole location and spacing will be determined by the size of your ears and your preferred earring style.
- Take your time and review the locations dots carefully before the piercing. This is an important step, so don’t rush it! If possible, remove your other earrings before dotting and piercing. Look in the mirror and make sure that the dots are lined up where you want them. If not, simply clean them off and dot again!
Safe healing starts with proper ear piercing aftercare. Follow the aftercare instructions provided with your Inverness Home Piercing Kit.
Here are the basic guidelines to follow:
- Healing Time
Earlobe Piercing: Leave piercing earrings in the ear for 6 weeks. Do not remove during this period.Cartilage Piercing: Leave piercings earrings in the ear for 12 weeks. Do not remove during this period.
- How to Clean Your Piercing
Each day and with clean hands: Cleanse 3 times daily. Using Inverness Ear Care Solution, thoroughly cleanse the front and the back of the earlobe around the earring and pierced area with a cotton swab soaked in a generous amount of solution.Turn 3 times daily: Turn earrings while cleansing.
- When can I change to new earrings?
Earlobe Piercing: After the 6 week healing period is completed, the piercing earrings can be removed and changed to other styles. During the 6 months following the initial healing period, do not go longer than 24 hours without earrings or the piercing may close. We recommend wearing light stud style earrings during this time.
Cartilage Piercing: After the 12 week healing period is completed, you can change to new styles. We recommend sticking to light stud style earrings to protect your piercing. To prevent your piercing from closing, keep earrings in 24/7 for 6 months after the healing period. If you want to change earrings, replace immediately with another or your new piercing may close.
Establecer su area de trabajo
- Busque un espacio limpio y bien iluminado con una silla para la persona que se va a perforar y una mesa donde pueda poner sus materiales de perforación.
- Revise todos los suministros incluidos y asegúrese de saber para qué sirve todo.
- Lea atentamente las instrucciones antes de comenzar. Mantenga las instrucciones a mano como referencia cuando realice la perforación.
Recordatorio: siga cuidadosamente las instrucciones proporcionadas en su kit de perforación para el hogar. ¡Aquí hay algunos consejos adicionales para ayudar a que su sesión de perforación en el hogar se desarrolle sin problemas!
- Marcar la oreja:
- Lávese y séquese las manos cuidadosamente y colóquese los guantes desechables proporcionados ANTES de limpiar la oreja para marcar y perforar.
- La parte delantera y trasera del sitio de la perforación debe limpiarse con la toallita con alcohol y déjela secar antes de marcar la oreja.
- Con el marcador quirúrgico de Inverness, marque las orejas. Comience colocando un pequeño punto en una oreja. Use un espejo para asegurarse de que el punto esté en el lugar correcto.
- Si el punto no está donde lo desea, límpielo con la toallita con alcohol y ¡comience de nuevo!
- Apuntar correctamente:
- Sostenga el instrumento firmemente en una mano y ubique la parte posterior del cartucho que contiene el arete perforador detras de la oreja.
- Coloque un dedo de su otra mano contra la parte posterior del instrumento (detrás del cartucho) como apoyo.
- Asegúrese de que el instrumento / cartucho esté paralelo a la cara para que el arete quede recto, no en ángulo con su cara.
- Use una presión uniforme. Presione lentamente el gatillo del instrumento para empujar la cápsula interna fuera del cartucho hacia el punto marcado.
- Solamente use la punta de plástico del cartucho para apuntar y alinear. NO empuje el arete fuera del cartucho hasta que esté alineado y listo para perforar.
- Asegúrese de que su ángulo esté recto y que esté alineado correctamente antes de perforar.
- Cómo perforar
- Una vez que esté alineado y listo para comenzar, perfore rápida y firmemente, presionando el gatillo hasta el fondo, hasta que no pueda avanzar más.
- Sostenga firmemente mientras cuenta lentamente hasta 3.
- Suelte y retire el instrumento moviendo hacia abajo y hacia afuera.
¡Repita estos pasos para la otra oreja!
Los puntos en esta oreja muestran dónde es seguro perforar con el kit de perforación para el hogar de Inverness.
Antes de marcar, observe el tamaño y la forma de cada oreja y la ubicación de las perforaciones existentes.
Primera perforación en el lóbulo de la oreja: Siga la línea natural de la oreja. Coloque el punto en el centro de el lóbulo(s).
Perforación múltiple del lóbulo de la oreja: Siga la línea natural de la oreja. Marque los puntos con una separación de 1/4 ”a 3/8”, según el tamaño y la forma de la oreja y los estilos de aretes que se usará más adelante. Verifique la ubicación para tener un espacio uniforme entre cada perforación y para la alineación correcta a lo largo de la cara.
Perforacion del cartílago externo: Las perforaciones de cartílago deben colocarse en el canal abierto ,justo dentro de la curvatura. No perfore dentro del doblez de la oreja ya que se dificulta poder marcar y peforar correctamente.
¿Está pensando en una segunda o tercera perforación en el lóbulo o el cartílago externo de la oreja? Tenga en cuenta estos consejos:
- Recuerde que cada oreja es única. Examine sus orejas cuidadosamente para determinar si tienen el tamaño y la forma correctos para adaptarse a los piercings que desea y los aretes que le gusta usar.
- Distanciando correctamente sus nuevos piercings: La persona promedio necesitará aproximadamente ¼ ”entre agujeros, pero el espacio es único para cada quien. La ubicación y el espacio entre los orificios estarán determinados por el tamaño de sus orejas y el estilo de aretes preferido.
- Tómese su tiempo y revise los puntos de ubicación cuidadosamente antes de perforar. Este es un paso importante, ¡así que no se apresure! Si es posible, quítese los otros aretes antes de marcar y perforar. Mírese en el espejo y asegúrese de que los puntos estén puestos donde los quiere. Si no es así, ¡simplemente límpielos y vuelva a pintar!
La curación comienza con el cuidado adecuado después de la perforación de la oreja. Siga las instrucciones de cuidados post-procedimiento proporcionados con su kit de perforación para el hogar de Inverness.
Estas son las pautas básicas a seguir:
- Tiempo de curación
Perforación del lóbulo de la oreja: deje los aretes perforantes en la oreja durante 6 semanas. No los quite durante este período.
Perforación de cartílago: deje los aretes perforantes en la oreja durante 12 semanas. No los quite durante este período.
- Cómo limpiar tu piercing
Cada día y con las manos limpias: Limpie 3 veces al día con la Ear Care Solution de Inverness incluida. Llimpie minuciosamente la parte delantera y trasera del lóbulo de la oreja, alrededor del arete y el área perforada con un hisopo de algodón empapado en una cantidad generosa de solución.
Gire 3 veces al día: Gire los aretes mientras se limpia.
- ¿Cuándo puedo cambiarme a aretes nuevos?
Perforación del lóbulo de la oreja: Después de completar el período de curación de 6 semanas, los aretes perforadores se pueden quitar y cambiar a otros estilos. Durante los 6 meses siguientes al período de curación inicial, no pase más de 24 horas sin aretes o la perforación puede cerrarse. Recomendamos usar aretes de estilo ligero durante este tiempo.
Perforación de cartílago: Después de completar el período de curación de 12 semanas, puede cambiar a nuevos estilos. Recomendamos que se use aretes de estilo ligero para proteger su piercing. Para evitar que se cierre el piercing, mantenga los aretes puestos las 24 horas del día, los 7 días de la semana durante 6 meses después del período de curación. Si desea cambiar los aretes, reemplácelos inmediatamente por otros o su nueva perforación puede cerrarse.